While there is admittedly a plethora of invoicing tools available, I’ve found that many of them come bloated with features that most freelancers and small-businesses don’t really need or use. So, I created Settle as an incredibly simple invoicing app powered by Stripe.
Using Stripe’s API to build an invoicing tool comes with a number of huge benefits. Perhaps most notable of them all is the fact that Stripe handles the heavy lifting of account creation, compliance, and secure encrypted storage of sensitive user data.
When a user creates an account on Settle, they are sent into the Stripe onboarding flow, which in addition to being fully compliant and secure, just looks really, really good.
Signing Up + Stripe Onboarding
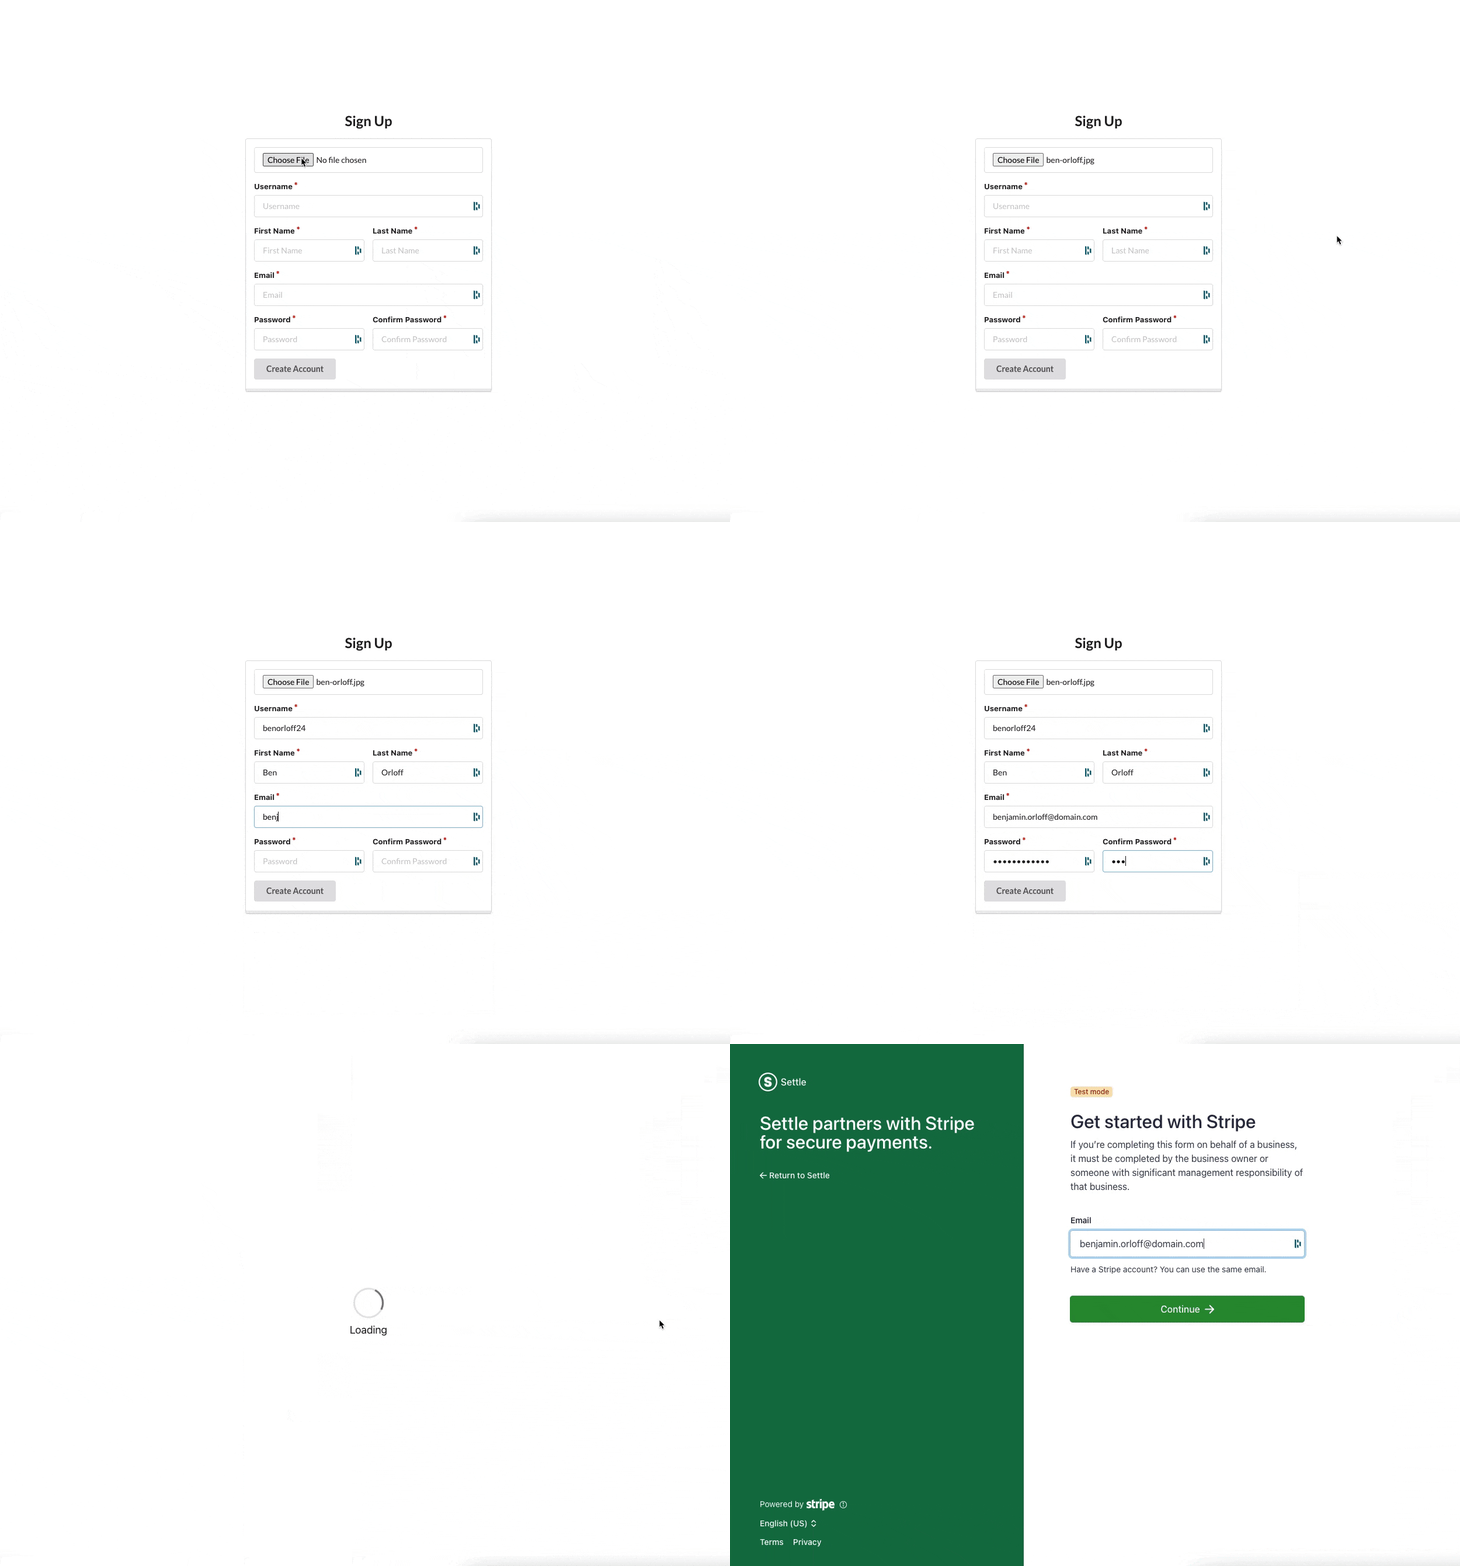
The signup form on Settle is pretty short and simple. Capturing this information from the user within Settle accomplishes two important objectives. First, we can create user documents in the application’s MongoDb cluster. Second, we can pass the form data to Stripe so that some fields are already populated during their onboarding flow, eliminating the need for the user to retype any information they already submitted to Settle.
The entire signup process is primarily handled by one function in the users controller, which accomplishes a few different actions.
async function signup(req, res) {
  const filePath = `users/${uuidv4()}-${req.file.originalname}`;
  const params = {
    Bucket: process.env.BUCKET_NAME,
    Key: filePath,
    Body: req.file.buffer,
  };

  const account = await stripe.accounts.create({
    type: 'standard',
    email: req.body.email,
  });

  const accountLink = await stripe.accountLinks.create({
    account: account.id,
    refresh_url: 'https://settle.herokuapp.com/login',
    return_url: 'https://settle.herokuapp.com/dashboard',
    type: 'account_onboarding',
  })

  s3.upload(params, async function (err, data) {
    const user = new User({
      ...req.body,
      photoUrl: data.Location,
      stripeAccountId: account.id,
      stripeAccountLinkUrl: accountLink.url
    });
    try {
      await user.save();
      const token = createJWT(user);
      res.json({ token });
    } catch (err) {
      // Probably a duplicate email
      res.status(400).json(err);
    };
  });
}
First, we are defining the filePath and params for the users’s profile photo to be uploaded to AWS S3. Then we are creating the user’s Stripe account and accountLink (this will be used to initiate the Stripe onboarding flow). Lastly, we are uploading the profile photo to AWS S3 and creating the user document in MongoDb.
Here’s the end result:

Logging In
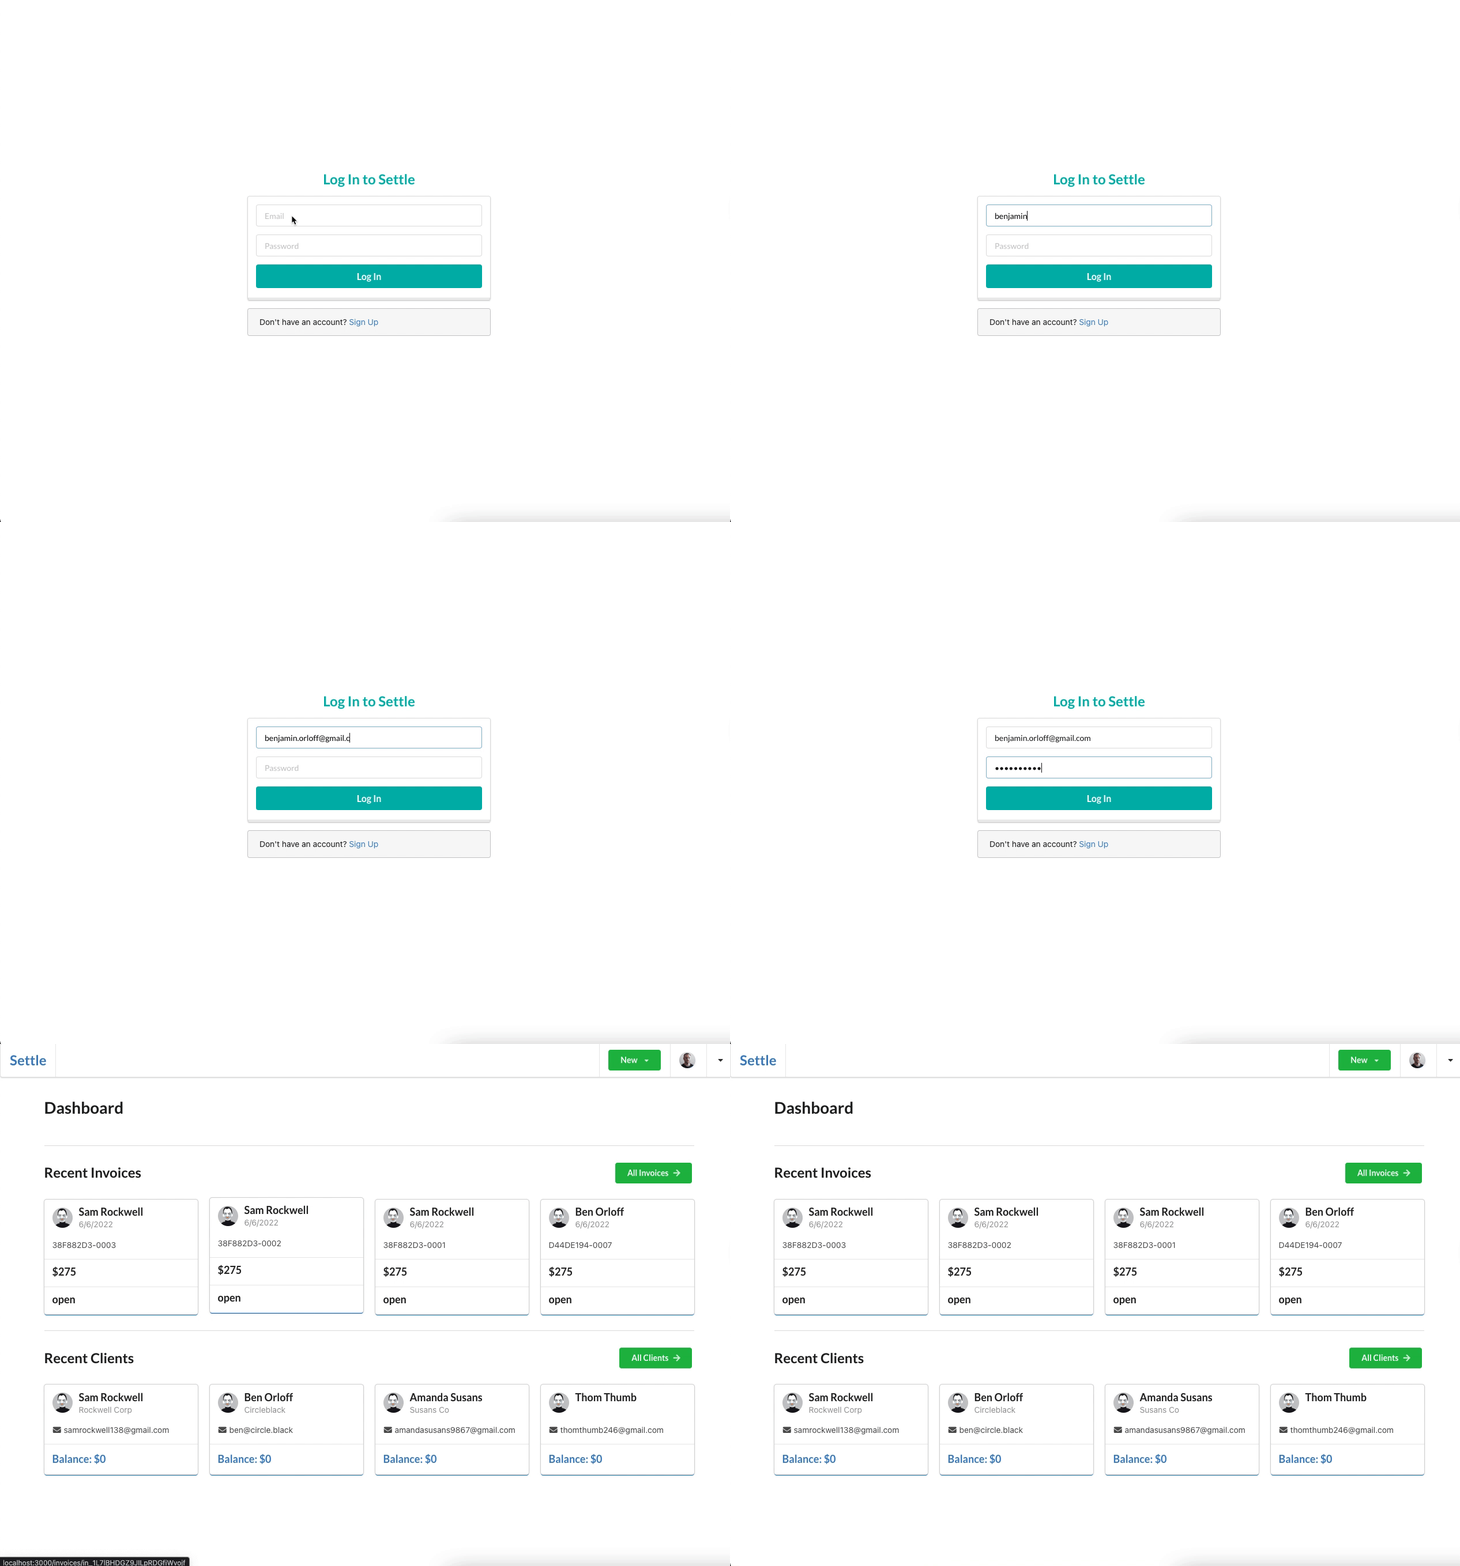
Settle uses JSON Web Tokens (JWT) for authentication. When a user logs in with valid credentials, we use tokenService.js to set their token and store in local storage.
function login(creds) {
  return fetch(BASE_URL + "login", {
    method: "POST",
    headers: new Headers({ "Content-Type": "application/json" }),
    body: JSON.stringify(creds),
  })
    .then((res) => {
      if (res.ok) return res.json();
      throw new Error("Bad Credentials!");
    })
    .then(({ token }) => tokenService.setToken(token));
}
After the successful POST request to api/users/login/, we call the setToken() function in tokenService.js to set the token in the browser’s local storage.
function setToken(token) {
  if (token) {
    // localStorage is given to us by the browser
    localStorage.setItem("token", token);
  } else {
    localStorage.removeItem("token");
  }
}
The user is then redirected to their dashboard and their JWT will be used to authenticate all requests until they log out.

Client List via Stripe API
One of the most important parts of an invoice is adding the recipient. This step in the process is important for a number of reasons. First, it determines who will be responsible for remitting a payment to the invoice. Secondly, it will inform Stripe who it will need to send the invoice to once it is finalized.
Filling out the recipient information for each and every invoice would be incredibly tedious and time-consuming. Thankfully, we’re able to send a GET request to the Stripe API’s /v1/customers/ endpoint and retrieve a list of all the user’s customers.
const stripe = require('stripe')(process.env.STRIPE_SECRET_KEY)

async function index(req, res) {
    try {
        const customers = await stripe.customers.list({
            stripeAccount: req.user.stripeAccountId
        })
        res.status(200).json({customers})
    } catch(err) {
        console.log(err);
        res.status(400).json(err);
    }
}
By passing in the ‘stripeAccount’ option, we can make the API call on behalf of the user’s connected account, rather than the platform. This returns a list of all customer objects for that connected account.
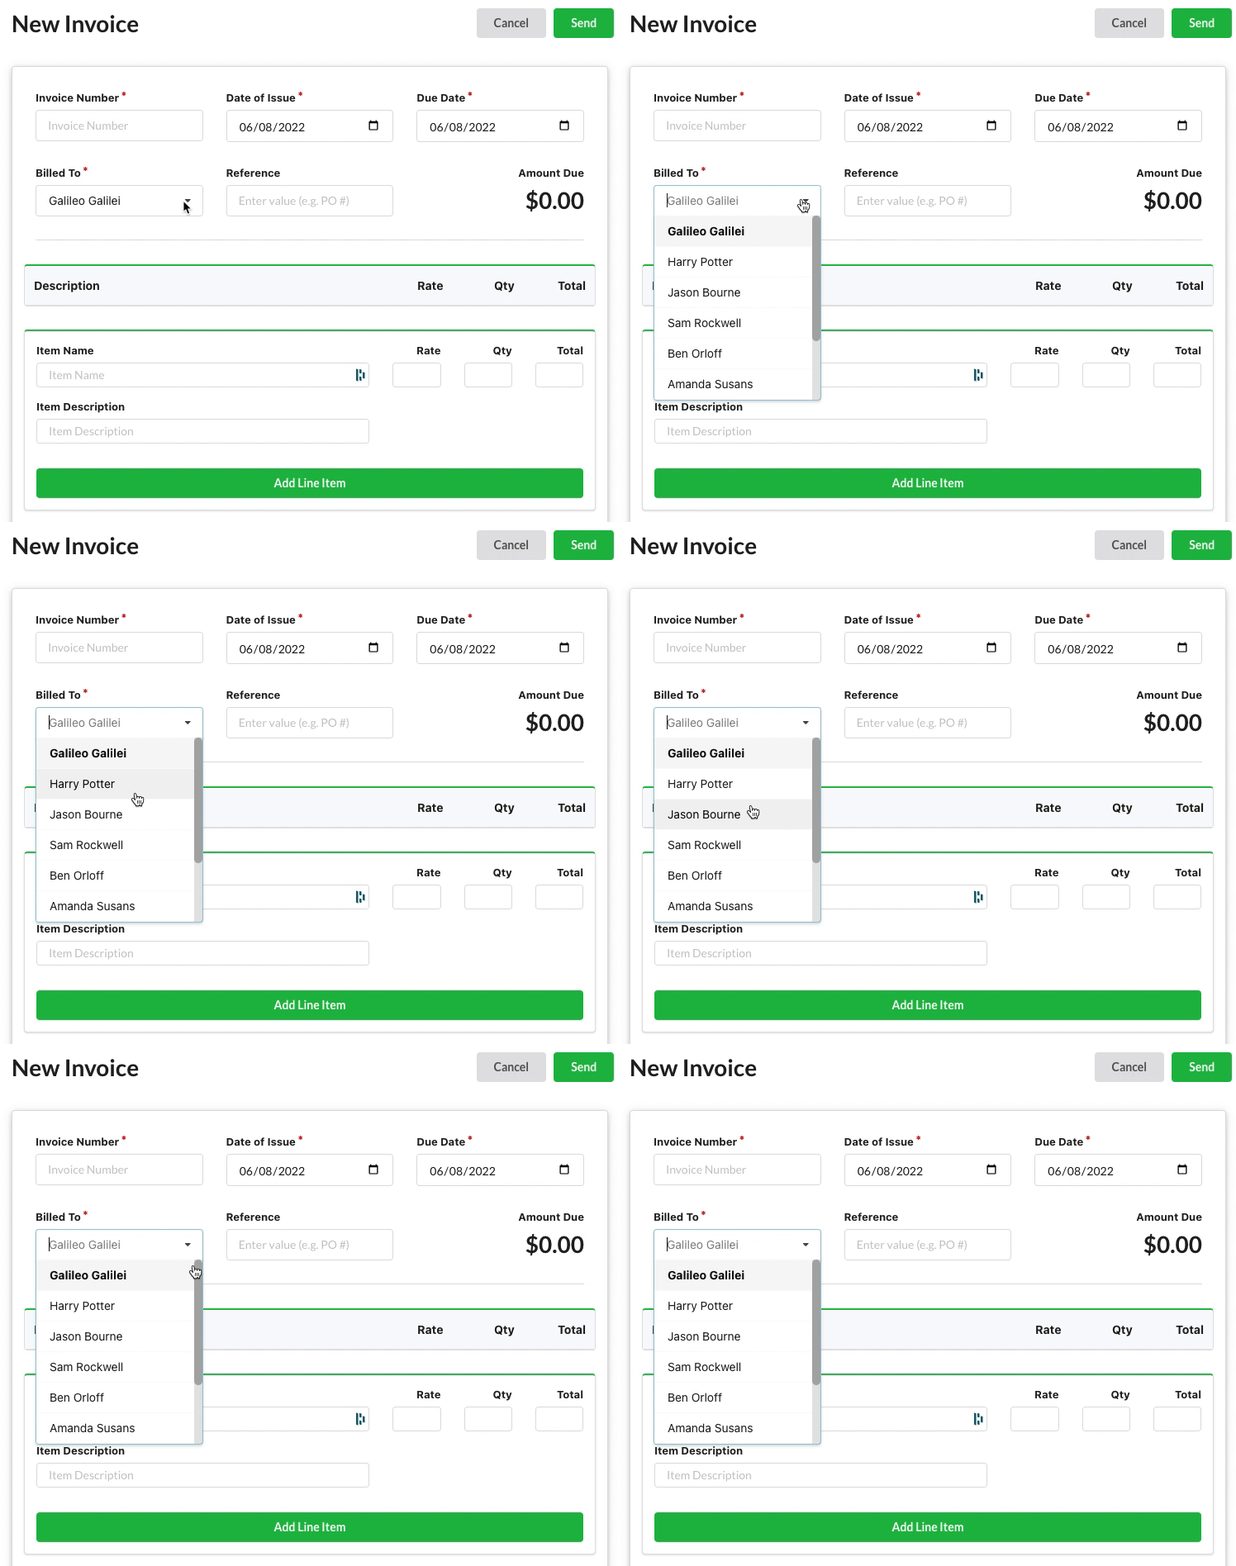
All we have to do after retrieving the response for this API request is to loop through all the customer objects and list the customer names in the dropdown with their respective ID as the value for the dropdown item.
const clientOptions = props.clients.map((client) => ({
     text: client.name,
     value: client.id,
     key: client.id
}))

{...}

<Form.Select
     fluid
     selection
     search
     name="stripeCustomerId"
     placeholder="Client"
     label="Billed To"
     options={clientOptions}
     onChange={handleSelectChange}
     required
/>
The final result looks like this:

Adding Line Items
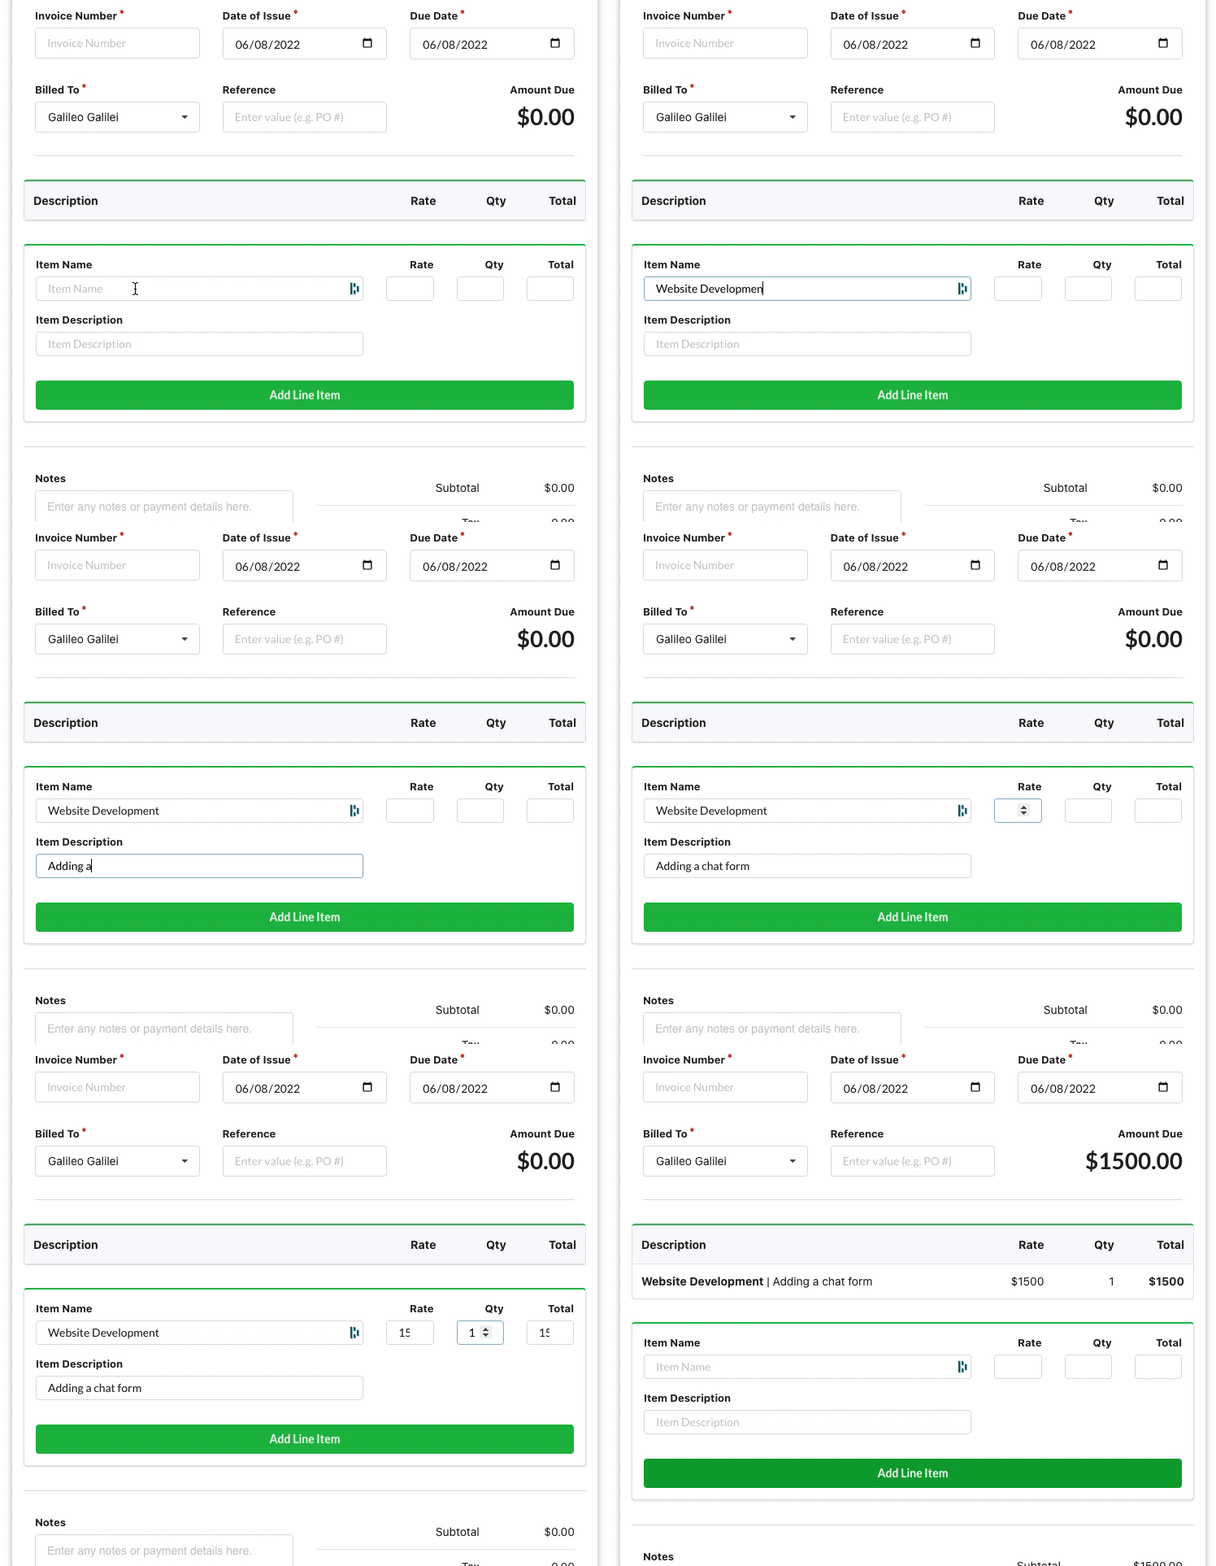
It’s usually helpful to separate an invoice into distinct line items for the different products or services being charged. This gives customers more context and clarity about what they are purchasing.
The programming challenge faced here is how to take the form inputs, extract them into a non-form element, and then re-render the form group to allow the user to continue adding new line items to the invoice.
This ended up being a great use-case for React’s useState() hook. By moving the form inputs into a separate state and clearing the state of the form, we can provide the user with a seamless experience.
const [inactiveLineItems, setInactiveLineItems] = useState([])
const [activeLineItem, setActiveLineItem] = useState({
    name: '',
    description:'',
    rate: '',
    quantity: ''
})

{...}

function handleActiveLineItemChange(e){
        setActiveLineItem({
            ...activeLineItem,
            [e.target.name]: e.target.value
        })
}

async function handleAddLineItem(){
        setNumLineItems(prevNumLineItems => {
            return {value: prevNumLineItems.value + 1}
        })
        setInactiveLineItems(inactiveLineItems => inactiveLineItems.concat(activeLineItem))
        const lastItemIndex = numLineItems.value;
        setActiveLineItem({});
}
But wait…there is still one more thing we need to do when a new line item is added. We need to update the Amount Due to display the new total. To accomplish this, we can leverage React’s useEffect() hook which will allow us to update state whenever a certain state is updated.
First, we need to establish state for the number of line items on the invoice. This is important because we only want the Amount Due to update when the number of line items changes.
const [numLineItems, setNumLineItems] = useState({value: 0})
We’ll set the initial value of this state to 0 so that the invoice initially renders without any line items. Then let’s establish state for the invoice fields as a whole.
const [state, setState] = useState({
        invoiceNum: '',
        issueDate: '',
        dueDate: '',
        reference: '',
        invoiceItems: [],
        notes: '',
        terms: '',
        subtotal: 0,
        tax: 0,
        total: 0,
        amountPaid: 0,
        amountDue: 0,
        attachments: [],
        userId: props.user._id,
        stripeCustomerId: '',
})
Finally, let’s write our useEffect() hook to setActiveLineItem and setState whenever the state of numLineItems changes.
useEffect(() => {
        setActiveLineItem({
            name: '',
            description: '',
            rate: '',
            quantity: '',
        });
        let subtotalCalc = 0
        inactiveLineItems.forEach((item) => {
                subtotalCalc += (item.rate * item.quantity)
        })
        setState({
            ...state,
            invoiceItems: inactiveLineItems,
            subtotal: subtotalCalc
        })
        console.log(activeLineItem)
}, [numLineItems])
By looping through each line item stored in inactiveLineItems, we can add the subtotal of that line item to a running total for the invoice.
The final result looks like like this on the front-end:

Settle leverages the Stripe API, specifically its Connect product, extensively. To see more, check out the links below:
GitHub Repo: https://github.com/benorloff/settle-app
Settle: https://settle.herokuapp.com/


 No products in the cart.